Journey to Cloud-Native Architecture Series #7: Using Containers and Cell-based design for higher resiliency and efficiency

In our previous Journey to Cloud-Native blogposts, we talked about evolving our architecture to become more scalable, secure, and cost effective to handle hyperscale requirements. In this post, we take these next steps: 1/ containerizing our applications to improve resource efficiency, and, 2/ using cell-based design to improve resiliency and time to production.
Containerize applications for standardization and scale
Standardize container orchestration tooling
Selecting the right service for your use case requires considering your organizational needs and skill sets for managing container orchestrators at scale. Our team chose Amazon Elastic Kubernetes Service (EKS), because we have the skills and experience working with Kubernetes. In addition, our leadership was committed to open source, and the topology awareness feature aligned with our resiliency requirements.
For containerizing our Java and .NET applications, we used AWS App2Container (A2C) to create deployment artifacts. AWS A2C reduced the time needed for dependency analysis, and created artifacts that we could plug into our deployment pipeline. A2C supports EKS Blueprints with GitOps which helps reduce the time-to-container adoption. Blueprints also improved consistency and follows security best practices. If you are unsure on the right tooling for running containerized workloads, you can refer to Choosing an AWS container service.
Identify the right tools for logging and monitoring
Logging in container environments adds the complexity of dynamic number of log sources, which can be short-lived. For proper tracing of events, we needed a way to collect logs from all of the system components and applications. We set up the Fluent Bit plugin to collect logs and send them to Amazon CloudWatch.
We used CloudWatch Container Insights for Prometheus for scraping Prometheus metrics from containerized applications. It allowed us to use existing tools (Amazon CloudWatch and Prometheus) to build purpose-built dashboards for different teams and applications. We created dashboards in Amazon Managed Grafana by using the native integration with Amazon CloudWatch. These tools took away the heavy lifting of managing logging and container monitoring from our teams.
Managing resource utilization
In hyperscale environments, a noisy neighbor container can consume all the resources for an entire cluster. Amazon EKS provides the ability to define and apply requests and limits for pods and containers. These values determine the minimum and maximum amount of a resource that a container can have. We also used resource quotas to configure the total amount of memory and CPU that can be used by all pods running in a namespace.
In order to better understand the resource utilization and cost of running individual applications and pods, we implemented Kubecost, using the guidance from Multi-cluster cost monitoring for Amazon EKS using Kubecost and Amazon Managed Service for Prometheus.
Scaling cluster and applications dynamically
With Amazon EKS, the Kubernetes metric server collects resource metrics from Kubelets and exposes them in the Kubernetes API server. This is accomplished through the metrics API for use by the Horizontal Pod Autoscaler (HPA) and Vertical Pod Autoscaler (VPA). The HPA consumes these metrics to provide horizontal scaling by increasing the number of replicas to distribute your workloads. The VPA uses these metrics to dynamically adjust for pod resources like CPU/Memory reservations.
With metrics server integration, Amazon EKS takes away the operational complexity of scaling applications and provides more granular controls on scaling applications dynamically. We recommend that hyperscale customers consider HPA as their preferred application autoscaler because it provides resiliency (increased number of replicas) in addition to scaling. On the cluster level, Karpenter provides rapid provisioning and de-provisioning of large numbers of diverse compute resources, in addition to providing cost effective usage. It helps applications hyperscale to meet business growth needs.
Build rollback strategies for failure management
In hyperscale environments, deployment rollouts typically have a low margin for errors and require close to zero downtime. We implemented progressive rollouts, canary deployments, and automated rollbacks to reduce risk for production deployments. We used key performance indicators (KPIs) like application response time and error rates to determine whether to continue or to rollback our deployment. We leveraged the integration with Prometheus to collect metrics and measure KPIs.
Improving resilience and scale using cell-based design
We still needed to handle black swan events and minimize the impact of unexpected failures or scaling events to make them more resilient. We came up with a design that creates independently deployable units of applications with contained fault isolation boundaries. The new design uses a cell-based approach, along with a shuffle sharding technique to further improve resiliency. Peter Vosshall’s re:Invent talk details this approach.
First, we created a cell-based architecture as described in Reducing the Scope of Impact with Cell-Based Architecture. Second, we applied shuffle sharding as described in What about shuffle-sharding?, to further control system impact in case of black swan events.
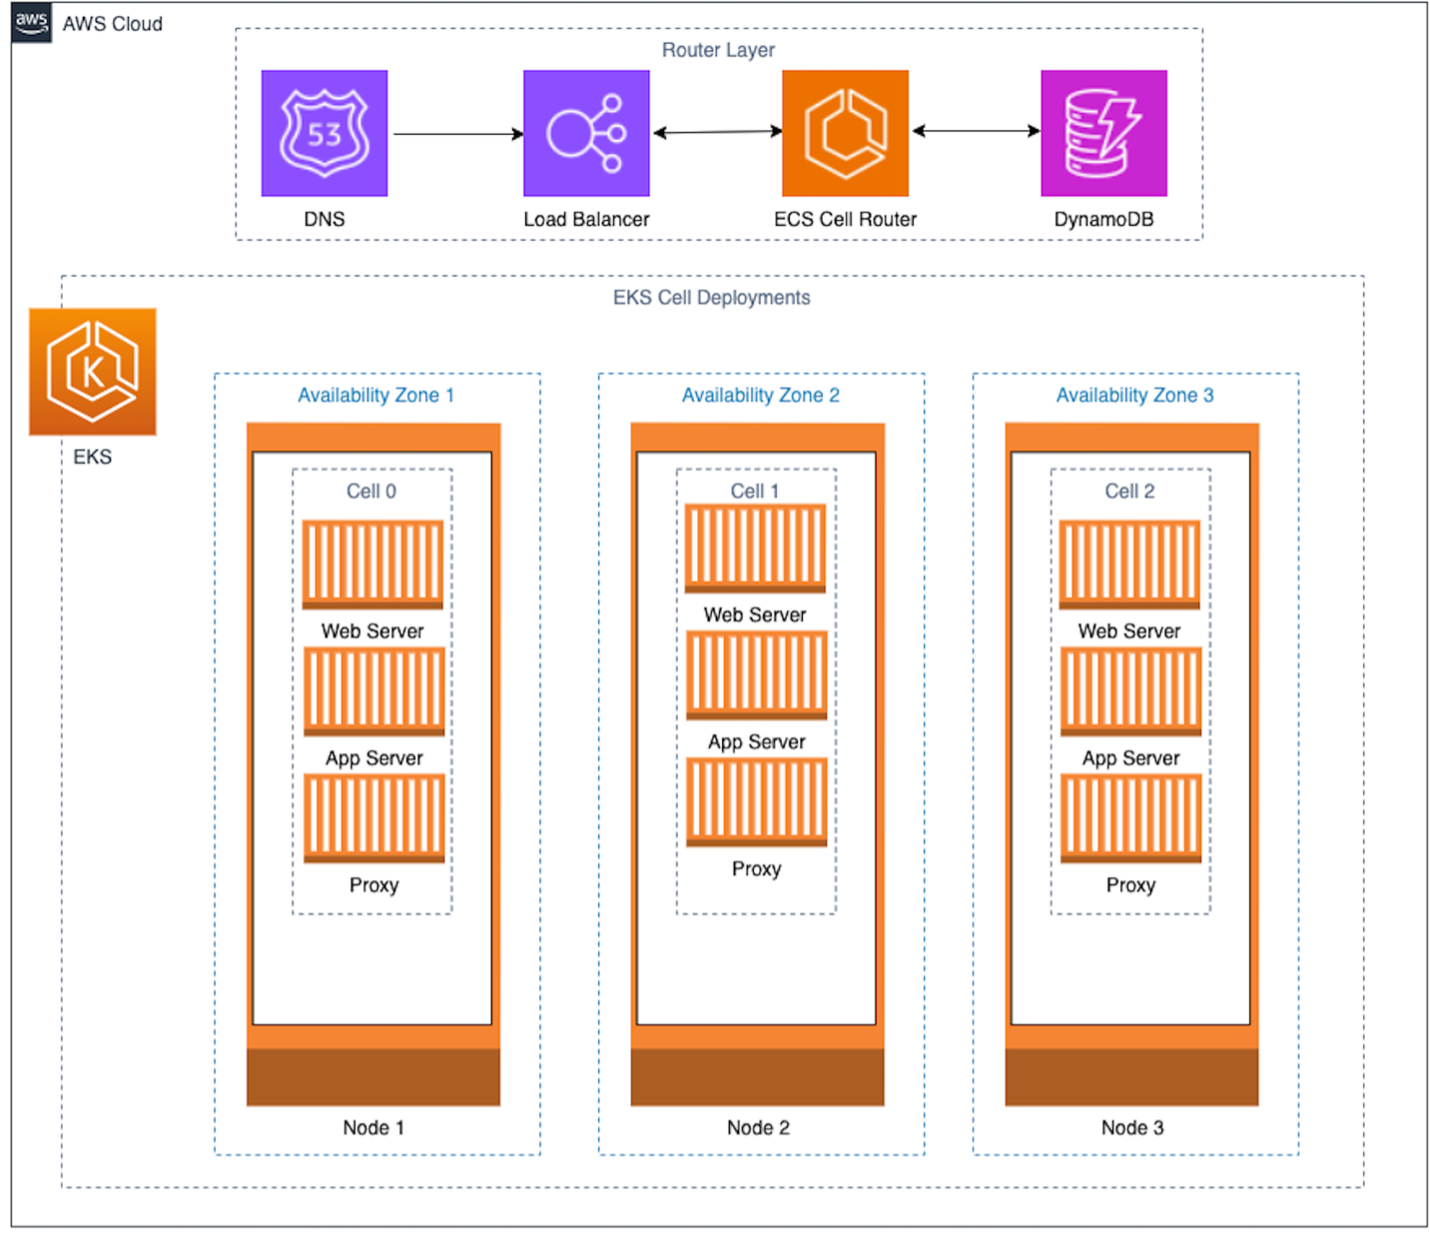
In Figure 1 we see two components:
- A light-weight routing layer that manages the traffic routing of incoming requests to the cells.
- The cells themselves, which are independent units with isolated boundaries to prevent system wide impact.
Figure 1. High level cell-based architecture
We used best practices from Guidance for Cell-based Architecture on AWS for implementation of our cell-based architectures and routing layer. In order to minimize the risk of failure in the routing layer, we made it the thinnest layer and tested robustness for all possible scenarios. We used a hash function to map cells to customers and stored the mapping in a highly scaled and resilient data store, Amazon DynamoDB. This layer eases the addition of new cells, and provides for a horizontal-scaled application environment to gracefully handle the hypergrowth of customers or orders.
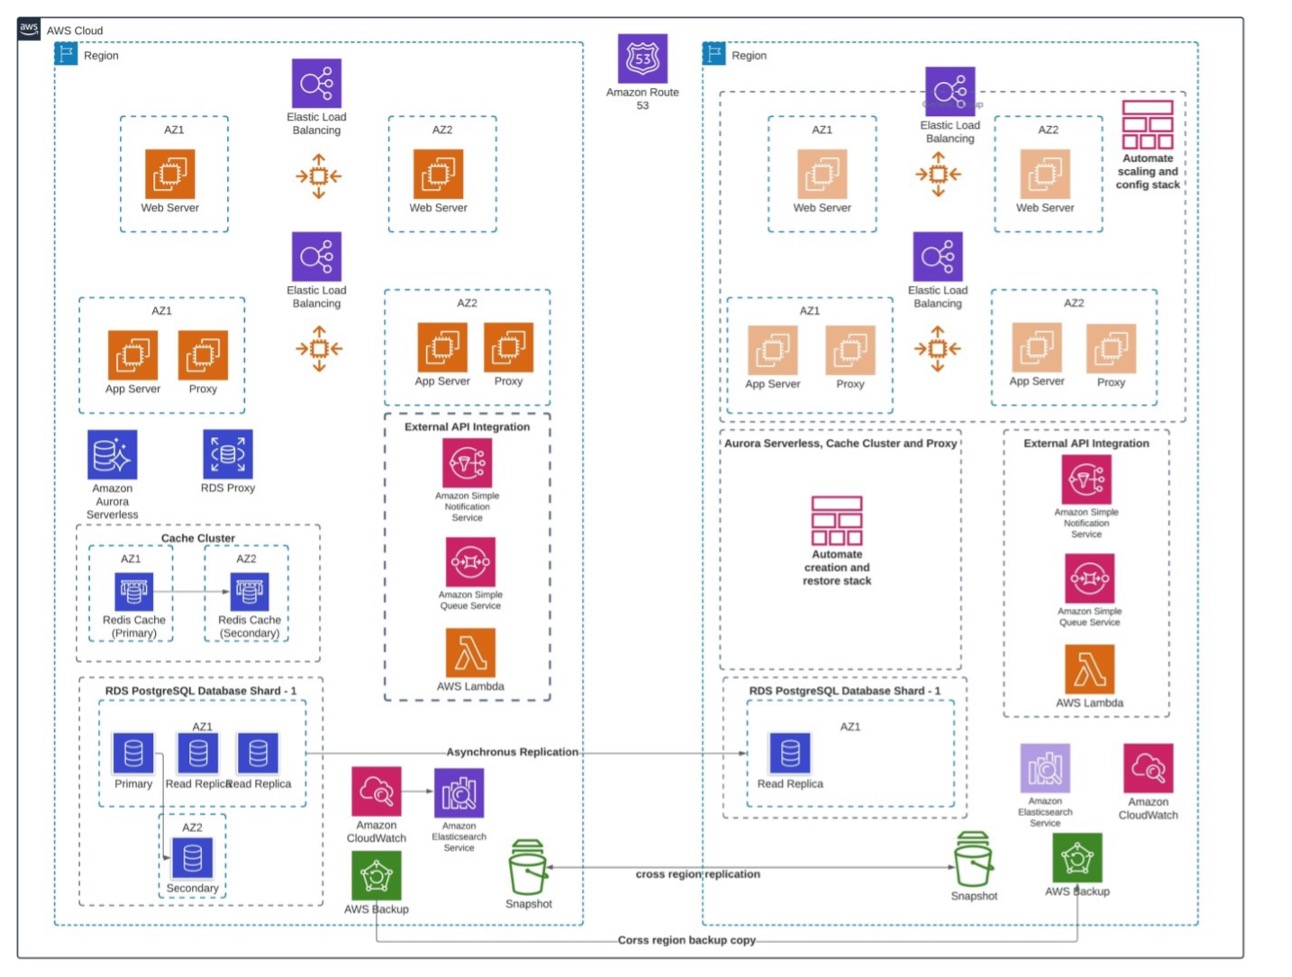
In Figure 2, we revisit the architecture as mentioned on Blog #3 of our series. To manage AWS service limits and reduce blast radius, we spread our applications into multiple AWS accounts.

Figure 2. Architecture from Blog #3
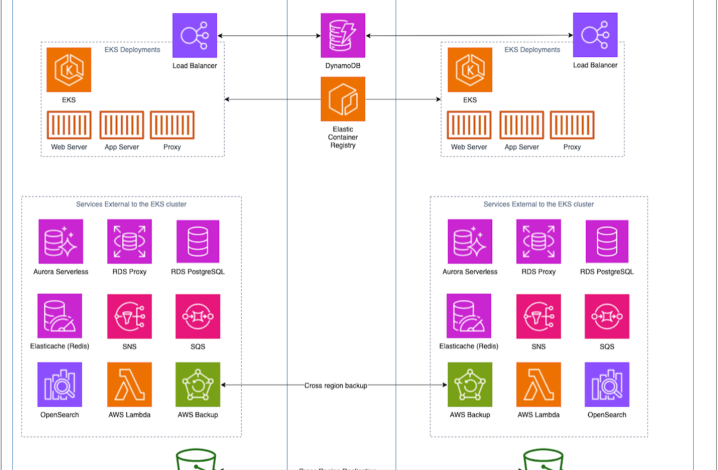
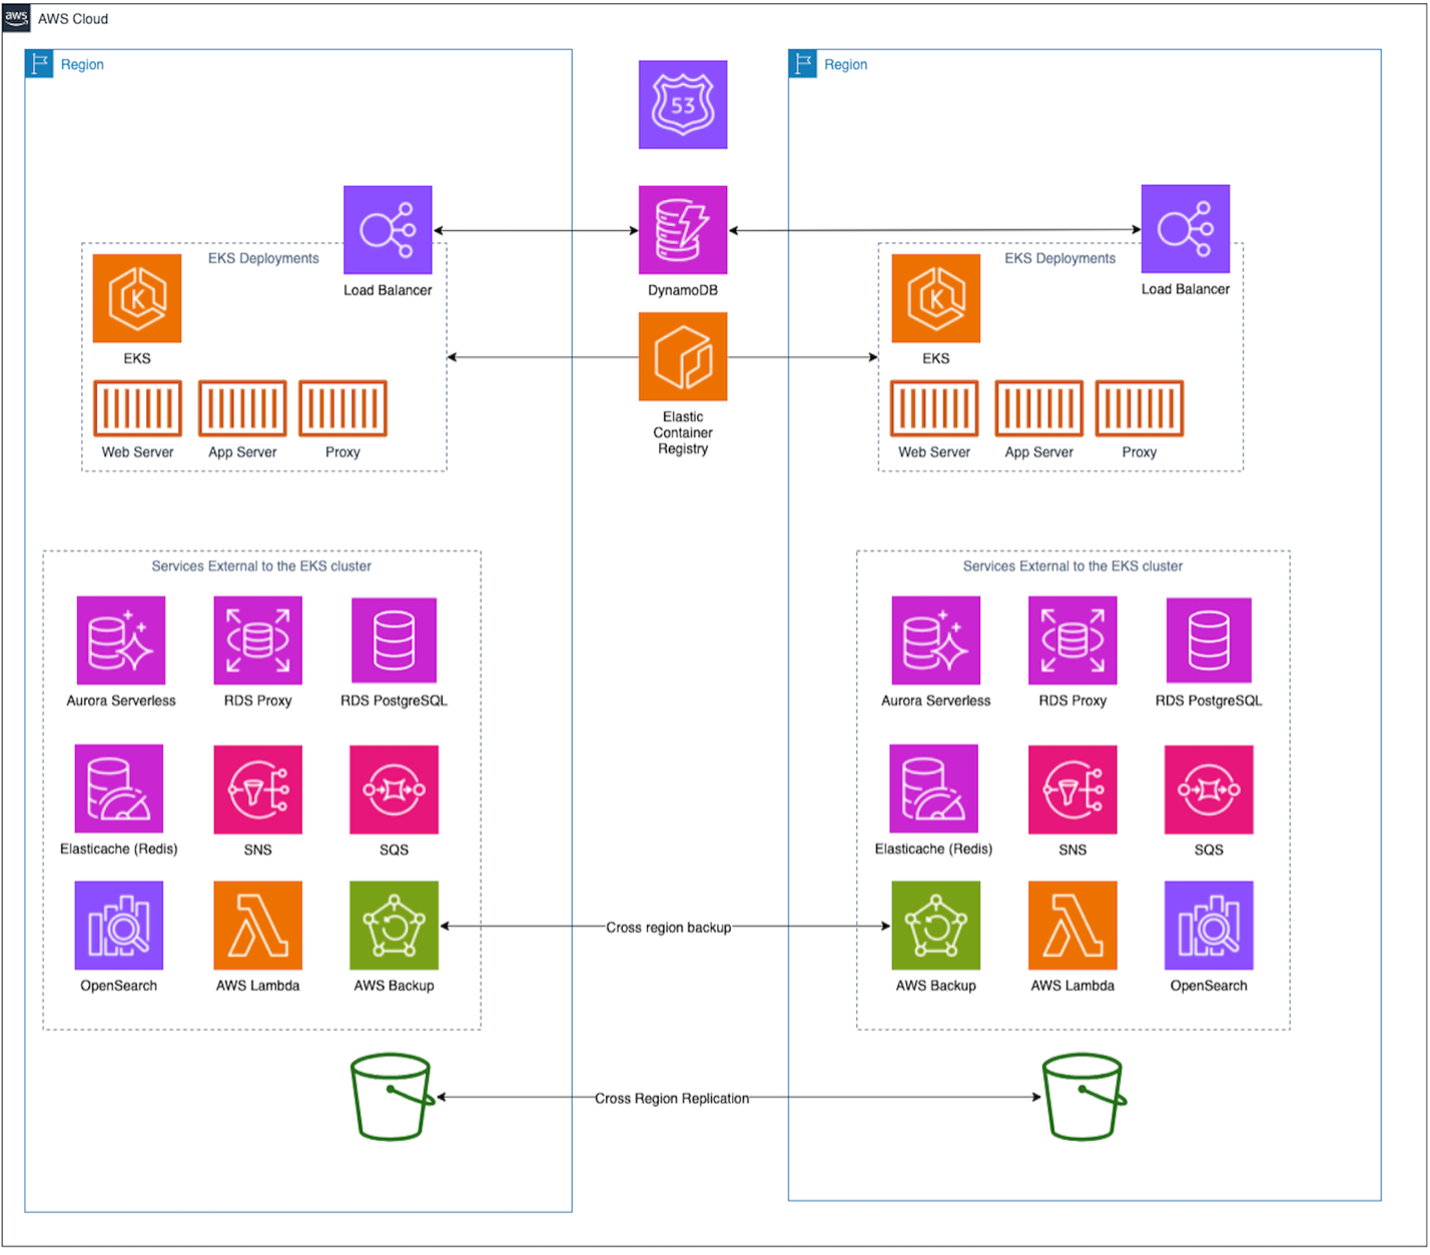
Here’s how the new design looks when implemented on AWS:

Figure 3a. Cell-based architecture
Figure 3a uses Amazon EKS instead of Amazon EC2 for deploying applications, and uses a light-weight routing layer for incoming traffic. An Amazon Route 53 configuration was deployed in a networking shared services AWS account. We have multiple isolated boundaries in our design — an AWS availability zone, an AWS Region, and an AWS account. This makes the architecture more resilient and flexible in hypergrowth.
We used our AWS availability zones as a cell boundary and implemented shuffle sharding to map customers to multiple cells. This reduces impact in case one of the cells goes down. Shuffle sharding also allows the architecture to scale in case we have unprecedented requests from a customer.
Cell-based design to handle Black swan events
Let’s discuss how our cell-based application will react to black swan events. First, we need to align the pods into cell groups in the Amazon EKS cluster. Now we can observe how each deployment is isolated from the other deployments. Only the routing layer, which includes Amazon Route 53, Amazon DynamoDB, ECS cell router, and the load balancer, is common across the system.

Figure 3b. Cell-based architecture zoomed in on EKS
Without a cell-based design, a black swan event could take down our application in the initial attack. Now that our application is spread over three cells, the worst case for an initial attack is 33% of our application’s capacity. We now have resiliency boundaries at the node level and availability zones.
Conclusion
In this blog post, we discussed how containerizing applications can improve resource efficiency and help standardize tooling and processes. This reduces engineering overhead of scaling applications. We talked about how adopting cell-based design and shuffle sharding further improves the resilience posture of our applications, our ability to manage failures, and handle unexpected large scaling events.
Further reading:


